Although India is not a country known for its cheese, paneer is the cheese that has left an indelible mark on Indian cuisine. Used in recipes like mattar paneer, paneer tikka, palak paneer, it is the most common Indian form of cheese. Paneer is an unaged and acid-set cheese that is similar to queso blanco, except that it has no added salt. Paneer is also a non-melting kind of a cheese, which is why it is often fried before being added to a dish. Unlike a lot of cheeses in the world, paneer is not made by the addition of rennet; it is therefore completely vegetarian.

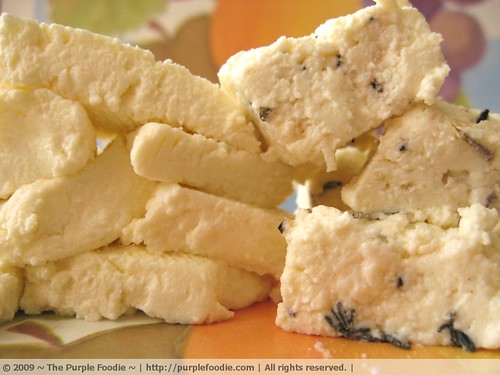
Here, fresh paneer is just a phone call away, so we don’t always make this at home. I was also a little worried about this homemade one not turning out as good as the store bought one, but after making this, I realise that the homemade version so much creamier. In fact, this time around I even tried a herbed variation – just before it’s time to set the cheese, I added salt, pepper and thyme. None of my friends could guess what it was because 1. it was so wonderfully creamy and 2. the addition of flavor threw them off, because traditionally, paneer has absolutely no salt added.
Paneer
Yield: 250gms/9oz.
1 litre/ 1/4th gallon whole milk
2 tsp lime/lemon/vinegar*
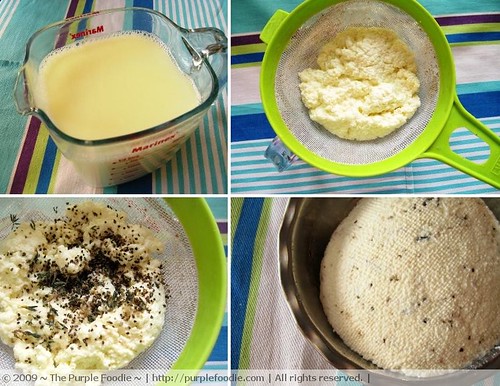
- Bring the milk to a rolling boil and add the lime juice or vinegar, whichever you are using, and keep stirring.
- You will see that the milk curdles into the cheese and whey. Turn off the heat at this point and let it rest for 5 minutes.
- Line a colander with a cheesecloth or use a fine mesh to drain off the whey.*
- Adding flavour: If you’d like, add salt, pepper and herbs and this point and blend it it with the panner
- Let this sit for an hour or so. If you’re using the cheesecloth then you can gather the sides together and wring it to get rid of the excess whey. While using the fine mesh strainer, press the paneer with a spoon.
- Here, I’ve drained the paneer for about an hour to achieve soft cubes.
- For firmer paneer, place some weight (heavy pan, pile of books, watermelon:)) on the paneer covered in cheesecloth for another 2 hours.
- Once firm, you can use it immediately by cutting into cubes or whatever, the recipe requires.
* A reader, Amy pointed out that when using bottled lemon juice, she needed to use 3-4 tablespoons of it (thanks, Amy!).
The paneer will keep in an airtight container in the refrigertor for upto a week.