From the category archives:

ice-creams sorbets and gelatos

Red Cherries

Cherries are in season! And I couldn’t be happier because this gives me a reason to bring my pitter out (see mom, I do use my stuff) and start making cherry desserts when I’m not chomping on them as a midnight snack.

I have been thinking of all sorts of cherry desserts – cherry granita, cherry crumb cake and of course the famous cherry dessert – clafoutis. To start off, I made myself a favourite: frozen yoghurt. It was pink (!) and smooth, and creamy, with gorgeous bumps of cherry pieces to bite into. I could only imagine how sweet it might smell with a little rosewater added to it.

Now when you’re pitting cherries, it’s important that you dunk them into a bowl with sugar, to coat the exposed layer of the cherry. Pitted cherries brown pretty fast, and though you can’t tell in cakes and pies, you can most certainly notice the brown tinge in a frozen yoghurt.

Pink Cherry Frozen Yoghurt

Pink Cherry Frozen Yoghurt

Serves 4-6

Ingredients:

1 lb / 450g cherries, pitted and coarsely chopped
1 lb / 450g thick yoghurt (I hung about 800g of yoghurt in a cheesecloth to give me 450g of yoghurt)
4 oz/ 11og caster sugar, or more depending on how sweet you’d like it
2 tsp vanilla extract ( almond is good too or rosewater)

Equipment: Ice cream maker

Method:

  1. In a bowl, mix the cherries, sugar and extract thoroughly and stir until all the sugar has dissolved.
  2. In a large bowl, add the yoghurt and stir in the cherry mixture.
  3. Now proceed to churn the mixture in your ice cream maker, or follow these steps to make them if you don’t have an ice cream maker.
  4. Transfer to a wide container and let it firm up in the freezer for a few hours before serving.

{ 13 comments }

Strawberry Sorbet

February 16, 2010

Strawberry Sorbet

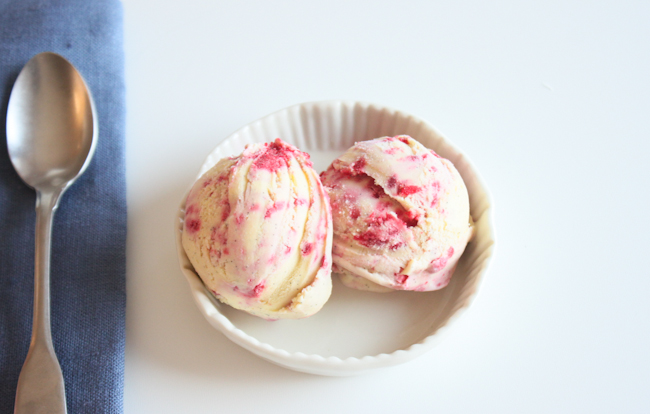
While I’m big on collecting kitchen tools and gadgets and I’d like to think that I put them all to good use, the one thing I regret not using enough of is my ice cream maker. And every single time that I do use, I end up kicking myself for letting it gather all the dust.

With strawberries aplenty, I churned out some strawberry sorbet. While I’m more of a rich, creamy ice-cream person, I found the sorbet to be refreshing and pleasantly light. Everyone at home licked their bowls clean and made me make them another batch the next day!

Strawberry Sorbet

With this sorbet, I’m all set to churn out some more ice-creams and sorbets. And like anything else I get obsessed with, I went and searched for some pretty ice-cream scoops. Just look at what I found! Scoops in assorted colours, anadorable pink scoop and a sturdy looking double coloured scoop. I know what I’m going to be dreaming of tonight.

Strawberry Sorbet

Strawberry Sorbet

1 pound / 450 g. fresh strawberries, rinsed, hulled and pureed
1/4th cup / 50 g. sugar (Indian strawberries are much sweeter, so you might need more sugar)
1/4th cup water
1 tsp
vanilla extract (vodka base – vodka keeps the sorbet soft)

  1. In a small saucepan, make the sugar syrup with 1/4th cup water and 1/4th cup (or more) sugar. Let it cool.
  2. In a bowl, mix together the pureed strawberries, sugar syrup and the vanilla extract. Stir well.
  3. Transfer to the freezer bowl of the ice cream maker and follow manufacturer’s instructions. If churning by hand, follow the instructions here.

{ 17 comments }

Oreo Cookie Ice Cream

June 19, 2009

Oreo cookie ice cream

I *LOVE* Oreo Cookies. And if you’ve hung around here long enough, you’d know just how much I love them. I’ve made cupcakes, Oreo pie with Philly cream cheese and brownies with Oreo cookies. It has now been quite a while since I got my Oreo fix; making a wonderfully rich and creamy Oreo ice cream seemed like the perfectly indulgent idea in this tropical heat.

I referred to Dorie’s recipe from her book Baking From My Home to Yours and followed the steps diligently after I had overlooked an important point the first time – instead of gently heating the custard, I turned up the heat and messy scrambled eggs soon followed. The second time around, equipped with an instant-read thermometer, I made sure to keep my eyes on it all the time. The second it reached 170F/76C, I took it off the heat. Another way of determining the doneness of the custard is to see that it coats the spoon. You don’t really need a thermometer for it, but it feels really cool do things in a scientific way – feels like Chemistry lab all over. Well, much better actually

This ice cream turned out beautifully; rich, dense and creamy. It is absolutely lovely on its own and even better with the Oreo cookie bits thrown it. Try it, you will love it!

Oreo cookie ice cream

Oreo Ice Cream
Vanilla base adapted from Baking From My Home to Yours
Yield: 1 pint

1 cup/240ml whole milk
1 cup/240ml heavy cream
1 tablespoon vanilla extract
3 large egg yolks
6 tbsp sugar
6-8 Oreo cookies, crushed

  1. In a heavy bottom saucepan, bring the milk and cream to a boil
  2. In the bowl of a stand mixer, or alternatively in a medium bowl whisk together the egg yolks and sugar together until very well blended and slightly thick.
  3. While the mixer is on, pour in half a cup on the milk-cream mixture so as to raise the temperature of the eggs. Then add another half a cup. Blend well. Do not stop stirring if you’re doing it manually.
  4. Now mix the custard mixture with the milk and cream in the saucepan. Stir well making sure all the sugar has dissolved (it’s best to do this before you turn on the heat source).
  5. Cook this ice cream mixture on a low heat, stirring constantly till the custard thickens and coats the back of the spoon.
  6. It should reach at least 170F/76C, and not exceed 180F/82C on an instant read thermometer.
  7. Just as it reaches this temperature, remove it from the heat source and strain it into another clean bowl.
  8. Stir in the vanilla extract.
  9. Refrigerate the custard before churning into cream.
  10. Once cool (a couple of hours or overnight) then churn according to the manufacturer’s instructions.
  11. During the last 5 minutes, when the mixture looks thick, throw in crushed bits of Oreo cookies.
  12. Transfer into a container, top with more Oreo cookie bits and freeze for at least 2 hours for the ice cream to be firm enough to scoop. Serve!

{ 34 comments }

Frozen Strawberry Yoghurt

March 10, 2009

Frozen Strawberry Yoghurt

I’ve been going ga-ga over strawberries this season. I went through so many packs of them, I can’t even remember. And just so that I don’t miss them when they’re not in season when I return from the States, I froze 2 kilos of them before leaving. Yes, I am that obsessed!

So when I found a recipe for frozen strawberry yoghurt on David Lebovitz’s website I just had to make it! And since this recipe  is good to make without an ice cream maker, I gave it a go.

I absolutely loved the results. Creamy, luscious and full of flavour. I was happy I left the seeds in to give it a natural feeling texture of real strawberries.

Frozen Strawberry Yoghurt

Frozen Strawberry Yoghurt

Adapted from: David Lebovitz

1 cup (240g) plain, whole milk yogurt
1 pound (450g) strawberries, rinsed and hulled
2/3 cup (130g) sugar
1 teaspoon fresh lime juice

  1. Tie the yoghurt in a cheesecloth and let it sit in a strainer in a bowl overnight or for atleast 2 hours. This will help drain off all the whey and result in a very creamy frozen yoghurt dessert.
  2. Cut the strawberries and toss it in the sugar until it begins to dissolve. 
  3. Blend it together until it forms a consistent puree. 
  4. Next, blend in the yoghurt and lime juice until the mixture is smooth.
  5. Freeze the mixture in a wide dish or plastic container (larger the surface area, quicker the freezing – since we have to pulse this mixture a couple of times).
  6. Keep checking on the mixture every 30 minutes or so and use the stick blender to break the icicles. I did it 4, maybe 5 times.
I did think an ice cream maker would make my job so much easier, but with these results, I was too happy to be licking frozen strawberry off the spatula to complain about the process. Simply astounding!

{ 35 comments }

Guava Sorbet

July 15, 2008

I have been wanting to make sorbet for a while but get dissuaded each time I see that recipes call for an ice cream maker. I know ice cream can be made with a little effort without a machine but if it’s out there in the market, I don’t see why I shouldn’t have it. But I’m only worried that I’ll use it probably 3 times a year and then it’ll end up at the back of my cabinet.

I wanted to make a sorbet in a refreshing tropical flavour and guava seemed to be the perfect choice.

Guava Sorbet

400ml / 14 fl oz. guava juice
25 ml guava ‘crush’* (pulp+sugar mixture) mixed with 75 ml water
Juice of 1 lime
100g. / 3.5 oz. sugar
200ml / 7 fl oz. water

  1. In a sacepan, combine the sugar and water. Stir over low heat to dissolve the sugar. Let it boil for 5 minutes. Take it off the heat and let it cool. (The base of a good sorbet would be a good sugar syrup. This gives it elasticity, so that it can be scooped with ease).
  2. Next, stir in the guava juice, the crush mixture and lime juice. For extra flavour, drop the lime wedges in the mixture.
  3. Freeze this mixture for an hour (I’d recommend using an air tight container). Discard the lime wedges and then whisk it rigourously to break all the crystals formed.
  4. Freeze the sorbet for about two hours before beating it again. And then finally a third time after yet another hour.

And there you have your sorbet! You know you can indulge because it’s fat free! :D

*This gives the sorbet a pretty pink colour and makes it sweeter. If you don’t have this, you can omit it and simply increase the sugar in the syrup. You could also try a raspberry syrup instead.

If you haven’t whipped it regularly, chances are that there will be some crystal formation, which will give you a rough sorbet, but don’t worry we have a euphemism for it – a granita – the rustic version of the sorbet fromItaly!

Verdict: My awfully fussy sis loved it. She is quite a difficult person to impress. Once she says she’s happy with what I’ve made I know my experiment is a success. :D

What I’ll do differently:
I loved the fragrance of mint as a garnish. Maybe I’ll throw in some chopped mint leaves the next time around.

All in all, a fun experiment and so easy to make!

{ 13 comments }