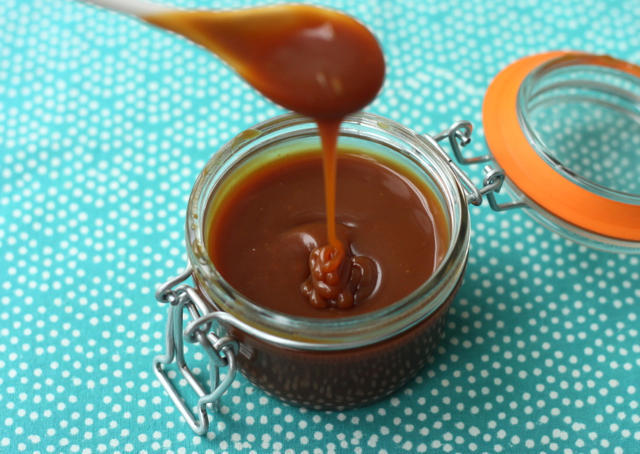
From the category archives:

dips spreads sauces condiments

The Best Caramel Sauce. Ever.

November 10, 2011

 Salted Caramel Sauce

A few days ago, when we were checking-out at the super market, I noticed that my husband (it still feels a bit weird calling him that) slipped in a bottle of caramel sauce, which actually was nothing more than an overdose of corn syrup with artificial vanilla and half a dozen chemicals. If that weren’t bad enough, he paid €6.50 for it!

That bottle of fake caramel struck a nerve. I couldn’t stand watching him drizzle that god-awful sauce over a gorgeous triple chocolate mousse cake he and a good friend made for my birthday (l’m one lucky girl). Sacrilege.  So I made caramel sauce with farm fresh butter and Maldon sea salt.

I quickly read up on tips laid down by David Lebovitz  on making the perfect caramel and within minutes I had my caramel sauce. Deep amber, thick, unctuous salted caramel sauce. The best. Ever.

Here’s a tip: When adding salt, you can add a part of it while the sauce is warm so it flavors the entire sauce evenly as it melts in, and then some more once the sauce has cooled and thickened so as to enjoy a bit of the salty crunch. Also remember, making caramel is a very quick process – you can’t step away from the pan of sugar even for a bit!

After I was done eating the sauce as if it were soup, I made myself an apple tart with puff pastry and Canada apples I bought from the farm.  Nothing too elaborate;  just puff pastry topped with thin slices of apples sprinkled with a bit of cinnamon sugar (just a bit – we want the sweetness from the salted caramel sauce later) and baked at 200ºC/400ºF until the pastry was golden brown.

Salted caramel sauce drizzled on the apple tart: heaven at home.

Salted Caramel Sauce

Salted Caramel Sauce Recipe

Ingredients

  • 200g / 1cup white sugar
  • 90g / 6tbsp unsalted butter (the best you can get your hands on)
  • 120g / 1/2 cup cream (double cream, preferably)
  • 1 tsp (or more) Maldon Sea Salt or Fleur de Sel

Cooking Directions

  1. Add the sugar in a thick bottomed pan and cook it till it melts. Keep swirling the pan so that the sugar can cook evenly.
  2. Once the sugar has reached a deep brown colour, pull it off the heat and add all the butter. It will foam up, so make sure you're using a pan with high sides. Stir until it's completely melted into the sugar.
  3. Next, pour in the cream (more foaming) and whisk in until you have a consistent sauce.
  4. Stir in half the salt. Let it cool completely. Stir in the remaining salt. Bottle it.
  5. Serve it on a cake, in a cake, over ice-cream, tarts, crumbles, pancakes, brownies, waffles, toast, granola. Everything.
  6. Store in refrigerator for upto two weeks.

UPDATE!

11th January: I made the caramel sauce again for a cake. This time, using salted Bordier butter. Turns out that this batch had a slight bitter taste that a bunch of you have written about in the comments. That’s our answer! For making this caramel sauce we must stick to using unsalted butter in case we want to avoid that bitter taste. Just for this recipe, Bombay folks, bite the bullet and spend a little extra on unsalted President butter available in most supermarkets. You will be hooked. I promise.

{ 67 comments }

Honey, Walnut and Fig Cheese Spread

When I was in Paris a few months ago, I was lucky to be living in the cutest little apartment with a well stocked pantry and the most gracious host. That’s where I first got a taste of this delicious cheese spread – light fluffy, sweetened with honey, and crunchy with walnuts and figs. I ate it spread on a baguette, slice after slice.

I’d never imagined I’d like my cheese sweet or I’d enjoy pieces of nuts in it. I’m usually the kind that carefully picks out cashews and almond from my food. But with this cheese spread it didn’t feel one bit odd. It was perfect. The subtle sweetness from the honey, the mild bite of the softened walnuts and the crunchy seeds of figs all worked in unison.

I brought back tubs of the cheese back home, but that didn’t last too long. With the yearning to replicate that flavour, I set out to make the cheese spread of my rêves. I started with whipping up equal quantities of cream cheese and cottage cheese together. The cream cheese brings in the tanginess, whereas the crumbled cottage cheese is perfect for a fluffy volume and a pleasantly inconsistent texture. To that I added a handful of roasted walnuts that dried figs that I chopped up. This is a chunkier version of the cheese spread with extra walnuts and figs. If you’d like a smoother version, you can cut the dry fruits by half.

Honey, Walnut and Fig Cheese Spread

Fig, Walnut and Honey Cheese Spread

Ingredients

  • 4 oz. / 125g. cream cheese (Philadelphia)
  • 4 oz. / 125g. cottage cheese, crumbled
  • 1.5 oz/ 50g. dried figs and roasted walnuts, chopped
  • 1 tbsp honey

Cooking Directions

  1. In a bowl, add the cream cheese and cottage cheese and gently whip together until evenly incorporated and slightly fluffy. It’s best to do this when both the cheeses are at room temperature.
  2. Next, add in the dry fruits and stir till they’re evenly distributed.
  3. Finally, stir in a tablespoon of honey for sweetness.
  4. Transfer to a container and store it in the refrigerator for a little while for the flavours to meld. Spread on bread or eat by the spoonfuls.

{ 22 comments }

Pesto Sauce


Everyone around here loves pesto. Much like the marinated peppers, pesto sauce has become a staple in our home. I make a batch every time my pots of basil are green and luxuriant again, and right now they’re growing wild. While I stick to my favourite pesto sauce recipe for it (from Ina Garten’s Barefoot Contessa Back to Basics), sometimes I wonder why my sauce is a tad bitter. I wonder if the nuts might have been bitter, and leave it at that without probing into the issue.


Just recently I discovered I was wrong about the poor nuts! The olive oil is the culprit here.


I stumbled upon the explanation for this on DelciciousDays.com, which in turn comes from Cook’s Illustrated:


“Extra-virgin olive oil contains bitter tasting polyphenols coated by fatty acids, which prevent them from dispersing. If the oil is emulsified in a food processor, these polyphenols get squeezed out and the liquid mix turns bitter.

The magazine further claims this is only a problem when mixing dressing or mayo, because in pesto the other ingredients as nuts and cheese are robust enough to cope with it. This is where I (Nicky) disagree; I rarely prepare pesto with extra-virgin olive oil in the food processor anymore – because of the indeed noticeable bitter outcome”


Who would have thought?


So anyway – now that we can’t put olive oil into the food processor, I added 1/4 cup water (just enough to keep it running) until it formed a thick paste. Once the paste was ready, I stirred in the olive oil and parmesan cheese. Voilà! No more bitter pesto!

{ 24 comments }

Of Updates and Olive Oil

July 16, 2010

Garlic Infused Oil

Things have been a little quiet on the blog, but it’s quite the opposite in the Purple Foodie kitchen.

Last week, friends who run a Bombay-based lifestyle website coaxed me into selling my bakes. Just two days after that conversation, The Purple Foodie Catering was born. “It won’t be much,” they told me. Clearly, they underestimated their reach. Messages and emails from readers and well wishers poured in, as did orders for a whole bunch of things. My recipe list doubled up as a menu for requests, and that’s how it’s pretty much going to work until I get a few hours to finalise and design the menu. If you’re in Bombay, you’ve got to subscribe to Brown Paper Bag’s weekend guides. They find these cute hole-in-the-wall places and report about new and fun things to do in the city.

A catering mini-launch was just one thing. I also began writing for another popular city blog. I submitted a story that I’m really proud of – a Crawford Market Guide; a guide to the city’s best food market. I worked with Matt to put the the interiors of the market on paper – something that’s not been done before for this Victorian era market. I looked through almost every shop to put together all the information you’re going to need on your next visit to Crawford Market. Be sure to download the map.

All of this week, I’ve pretty much been elbow deep in flour, and absolutely loving every bit of it. So here I am running around getting some basic packaging in place, buying supplies and delivering the bakes! Regular food blogging should resume soonish.

Another thing I wanted to talk to you about is garlic oil. Loads of sliced up garlic, fresh thyme, red chilli flakes infused into fruity extra virgin olive oil over the slightest simmer (yes, simmer because the moisture from the garlic will make the oil bubble and appear as though the oil were simmering). In all of 15 minutes, you will have sweet garlic slices that you could eat without feeling the bite. I can imagine this being so perfect with plain boiled pasta.  And to top that you will be hit by a fragrance of sweet, spicy and herby all at the same time.

Garlic oil is excellent in salad dressings, as a finishing oil for pastas and risottos, or best of all, to make these garlicky baked fries (which incidentally, have got 171K views so far). I pretty much eyeballed the garlic oil, so measurements are approximates: 1 cup extra virgin olive oil, 7-9 cloves of garlic (sliced), a few sprigs of fresh thyme and 1 tsp red chilli flakes. This makes enough to last me about a week, so it should for you, too.

{ 22 comments }

Homemade Pesto Sauces

March 24, 2010

Pesto Sauce

One of my favourite local pizza restaurants serves a bread basket with three dips: sundried tomato, tahini and pesto. While my sister and orangefoodie make sure to try every dip on the platter, I choose to fill myself up with the pita bread slices and pesto sauce. Sometimes I get so carried away nibbling on these that I end up eating barely a single slice of pizza!

Over the weekend, I tried making my own pesto for the first time. Dead easy! All you need to do is assemble all the ingredients and let the food processor do its job. Thanks to Deeba who mailed me basil seeds, I now have a couple of bountiful pots of basil. I can’t tell you how intensely fragrant home grown basil is compared to store bought. The heady aroma is almost intoxicating. Sometimes I find myself plucking a leaf just to rub it between my fingers and get hit by the sweet smell of basil. I hope you have access to fresh basil,and if you’d like, I’ll be happy to send you some seeds!

I used Ina Garten’s recipe as a base and I absolutely loved how it turned out. In fact, my family has been devouring the pesto as a condiment with every meal for the past few days. I also used part organic pine nut oil to accentuate the pine-nutty-ness of the pesto.

Making Pesto Sauce
Pesto Sauce

Adapted from: Barefoot Contessa Back to Basics

1/4th cup pine nuts
1/4th cup walnuts
6-9 cloves of garlic
1/2 – 1 tsp coarse sea salt
4 cups basil, washed and dried
1 cup Parmesan cheese, freshly grated
3/4th cup olive oil
3/4th cup pine nut oil (or olive oil, if you don’t have pine nut oil)

  1. In a food processor, grind the walnut, pinenuts and garlic to a paste. Add the salt.
  2. Add the basil leaves and maybe a tiny little bit of oil or water for it to come together.
  3. Add the parmesan cheese.
  4. Now through the feed tube, pour in the oils until evenly blended.
  5. Transfer to a jar and serve and use as you like!
On a side note, I haven’t really thought of too many ways to use pine nut oil besides this pesto sauce and maybe as a salad dressing. What do you generally use it for?

{ 42 comments }