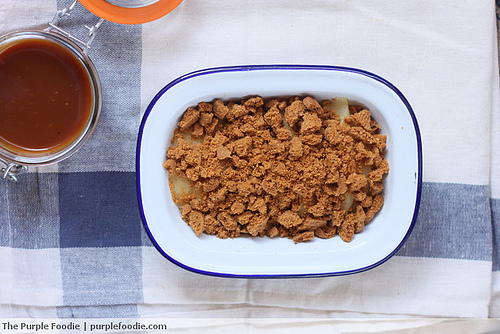
From the category archives:

pies tarts and crumbles

Apple Pie Pockets

March 28, 2011

Each morning I take the train to the other end of town to study French. With a copy of Best Food Writing 2010, some roasted nuts and orangefoodie for company, it’s a fun ride. There are some days when breakfast on the train is an event we look forward to with homemade Snickers or rich chocolate brownies. However, that’s a tad messy to eat on the train, and then there is the task of opening this large blue square box in the middle of the train compartment without eliciting unnecessary gazes.

One day I felt like eating apple pies. Juicy, cinnamon-y, flaky crusted apple pies. There was little chance of me eating a regular apple pie on the train without having a piece of golden caramelised apple on my jeans, or worse still, on my co-passenger’s shiny leather shoes. And I still really, really wanted to eat an apple pie for breakfast. That’s when I thought I’d make these apple pie pockets. Caramelised apples encased in flaky pastry dough and baked to a perfect golden glow. So convenient to eat, much like pop tarts.

Green Apples

Pie pocket pointers:

  • Roll out the dough thinner than you think you should. A rule I follow: I should be able to see the colour of my electric blue rolling board through the dough. This is because the pastry dough will get thicker on baking. Not just that, with pie pockets, you have double crusts – and you certainly don’t want to just taste the crust with a diminutive piece of apple peaking through.
  • Poke the top with a fork to let the steam escape.
  • Brush the pie pocket with egg wash right before baking for the gorgeous golden sheen.
  • If you’d like, spoon some applesauce along with caramelised apples in the pockets to heighten the apple flavour. I did this for the second batch of apple pie pockets I made, and it took it to a whole new level. I highly recommend it.

The caramelised apples really have no recipe – I just made it up as I went along. A tablespoon of butter, 3-4 tablespoons of sugar and chopped apples thrown in and cooked till soft, yet firm to the bite, finished off with a little cinnamon. Set this aside to cool while you get ready to roll out the dough. In case you still need a little more hand-holding, here is a detailed recipe for caramelised apples.

For the dough I used my favourite flaky pastry dough recipe. Roll out the dough and using a round or rectangular cookie cutter, cut out pieces of dough. Place the cooled caramelised apple filling on the dough, making sure to leave enough space around the edges. Place a pie of cut out dough on top of the apples, and seal the edges by pressing down gently with your fingers. Make incisions with a knife or a fork, followed by an egg wash and then finally bake it in an oven at 175°C/350°F until golden brown and fragrant. Baking time will vary depending on the size of your pie pocket, but keep an eye on it post 7-8 minutes

{ 30 comments }

Onion Tart with Goat Cheese

You know what’s a good practice? Keeping some tart dough in the freezer.

It perfect for times when you want to fix yourself a quick snack, or probably have guests waltzing in. All you have to do it let the dough thaw while you get your choice of filling ready. I had some goat cheese at hand today so I make some caramelised onions, and garnished it with a little spearmint from my window sill. This garnish was quite an afterthought, really. But when I bit into the tart with the mint – the flavours came together so well! I felt so elated for discovering this, only to turn to the mighty Flavour Thesaurus and finding the exact same combination already mentioned. Deflated ego.

While folks on Facebook commended the genius of the flat tart, what really happened was that I miscalculated the diameter of the dough I should have cut. I definitely didn’t want to re-roll the dough and commit a dough-crime so I stuck the tart dough into the tart tins just as is. I blind baked them with weights until the crust was golden with slightly puffed up sides. I then spread the caramelised onions on it and dotted it with goat cheese. And just because I’m fixated with my blow torch I slightly melted the cheese with it. You could just as well stick it under the broiler.

With tart doughs, it’s very important to let them take a nap in the fridge once you’ve formed the dough. While the dough rests, the gluten relaxes and all the liquid in the dough is dispersed evenly. This ultimately leads to a tender, flaky tart crust – the kind that will win hearts. Moral of the story (repeated): Always have some tart dough in the freezer, because rushing the process won’t do you any good.

Onion Tart with Goat Cheese

Caramelised Onion Tart with Goat Cheese

Serves: 6

Savory Tart Dough Recipe

250g flour
125g butter
3-4 tbsp ice water

Instruction here.

Caramelised Onion Recipe

Inspired from: Egg, Michel Roux (USA | UK | India)

Ironically, I am not using the book for an egg recipe, but for the caramelised onion recipe that I have grown to adore. It’s so easy, and so delicious. People always want to know how it’s made when they try it.

1 tbsp extra virgin olive oil
2 tbsp butter
6 medium onions, finely sliced
1/3rd cup cream

In a saucepan, heat the olive oil and butter. Throw in the onions and cook them until golden brown, Make sure to stir it continuously, lest it stick to the bottom of the pan. When all of it has evenly browned, add the cream and cook it for another 4-5 minutes. Remove from heat, and let it cool.

Assembling:
Spread a generous layer of caramelised onions on the cooled tart base and top it with some crumbled goat cheese. Stick this under the broiler if you’d like to melt the cheese, or eat it as it is. Garnish with the sprig of mint and serve.

{ 18 comments }

Blueberry Crumb Bars

I’m going a little nutty over blueberries. And for once, I’m not simply ogling at recipes I see online and then letting out a sigh because I can’t have any. Instead, I’m going to town bookmarking blueberry recipes (if you have any, please share!) and of course, enjoying snacking on the berries with tonnes of vanilla yoghurt.

I stocked up on my share of blueberries over the weekend and decided on making some blueberry crumb bars. Now although the berries are available by the truckloads at the supermarket, they don’t come at a very pocket-friendly price, so I’ve to make sure to use the blueberries like a frugal Indian girl. Add to that the pressure of delivering no-fail recipes from the Purple Foodie Kitchen (phew!). The best part about the recipe? It’s easy! You don’t have to fuss over rolling out the dough. Instead, you just press the crumbly dough into the pan.

I set out to make blueberry crumb bars using the sweet tart dough from Tartine and a cup of blueberries with a little bit of vanilla sugar. The same tart dough was used as a crumb topping to give the most delicious crumb bar there is.  No really, it is. You’ve got to try it to believe it. When you bite into a piece of the blueberry crumb bar, the buttery crumbs on the top melt in your mouth. Next, the tart berries in their unctuous syrup tickle your tongue (thank goodness for vanilla sugar). And finally the crust shatters, delicately into your mouth. Pair this with a good heaping of vanilla yoghurt, and your heart will start singing. Just as I write this post, I’ve had three slices already.

Blueberry Crumb Bars

Okay, so in other news, The Purple Foodie turns 3 this week! Geez, I can’t believe it’s been that long. Three whole years! To celebrate the milestone, I’m giving away this gorgeous silk handmade clutch from one of my favourite ethnic stores. I got one for me, and one for you. Boys, don’t be disheartened, I’ve got more stuff coming up through the week (spices! books!). Plus you know, you could give this to your other half – trust me, she’ll love it!

  • Just leave a comment and let me know what you’d like to see more of on The Purple Foodie or what makes you come back to the blog, and consider yourself entered for the giveaway.
  • I’ll be shipping worldwide, so everyone’s welcome to enter!
  • For an additional entry, tweet about the giveaway (you could either come back here and let me know or mark me on the tweet @purplefoodie or #purplefoodie)
  • The giveaway is open until 30th September, 2010.

Handmade Silk Clutch

Blueberry Crumb Bars

Yield: 8 wedges from a 8 inch tart pan

For the base as well as crumb topping
Inspired from Tartine (USA | UK | India)

100g icing sugar
250g flour
150g / 3/4th cup butter
1 egg

Filling:
1cup / 200g blueberries
2 tbsp vanilla sugar

Equipment: 8 inch tart pan, pastry cutter

  1. Preheat the oven to 375°F/190°C.
  2. In a medium bowl, stir together the flour and sugar. Use a fork or pastry cutter to blend in the butter and egg. Dough will be crumbly. Pat most of dough into the prepared pan (1/3rd inch thick).
  3. In another bowl, stir together the blueberries and the vanilla sugar. Sprinkle the blueberry mixture evenly over the crust, making sure to leave some space around the periphery. Crumble the remaining dough over the berry layer. In case you’re left with additional dough (I was) you can freeze it for up to three weeks, or use it as a simple cookie dough.
  4. Bake in preheated oven for 30-35 minutes, or until top is slightly brown. Cool completely before slicing into wedges. Yep, the hardest part is the wait.

{ 93 comments }

Zucchini and Onion Tart

September 7, 2010

Zucchini Onion Tart

This is not your average tart. For starters, it doesn’t use tart dough for a base, but pizza dough, and secondly, it calls for a layer of thick yoghurt and cheese beneath the vegetables. Both the deviations from the norm seemed rather interesting, and the picture in the book looked too good to pass up to make for lunch today. Where did I get this unconventional recipe from, you might wonder? It’s from the Popina Book of Baking.

I first heard of Popina Bakery on Rachel Allen Bake and really liked what I saw. The unusual name is hard to forget, so when I saw a book titled Popina at my local bookstore, I quickly pulled it out. Gorgeous, gorgeous photos and refreshing recipes pushed me into buying the book. It took me a while to decide which recipe I’d try first, and when I got my hands on some fresh zucchini, it was decided: I’d make the zucchini and onion tart (leaving out the fennel, which isn’t easy to find here).

Using pizza dough as a tart base is just genius – it makes life so much simpler! For once you won’t have to worry about attaining the perfectly flaky tart crust (although, it’s perfectly normal to be persistent about it) or letting the dough rest in the fridge for a few hours before rolling it out.

I especially love vegetables that are roasted until the point they look charred, and the innate sweetness is showcased. In fact, while the zucchini and onions were roasting, I might have opened the oven door a few times to sneak some for a quick snack, topped on cream crackers.

Zucchini Onion Tart

Zucchini and Onion Tart Recipe

Adapted from: Popina Book of Baking (USA | UK | India)

Pizza Dough Base:
220g flour
1 tsp instant yeast
1/4th tsp salt
½ tsp sugar
2 tbsp extra virgin olive oil
1 egg
80ml warm water

Filling:
400g zucchini, sliced
2 medium onions, sliced
40 ml olive oil
1 tsp salt
½ tsp pepper
100g mature cheddar
150g thick yoghurt (hung in muslin cloth or you could use Greek yoghurt)
1 tsp chilli flakes (or more depending on how hot you like it)

Equipment:
10x33cm tart pan (I SO want this!) or an 8 inch round pie dish (this is what I used)

Method:

  1. For making the dough: Mix the dry ingredients together in a bowl. Create a well in the centre of the ingredients and add the egg, olive oil and water. Draw everything together with your hands and knead until you get a soft, pliable dough. If you’re using a KithenAid, knead until the dough comes together and passes the window pane test. Transfer to a lightly floured surface and knead for two more minutes. Let it rest while you prepare the filling for the tart.
  2. Filling: Put the zucchini, onions, olive oil, salt and pepper in a roasting pan and roast in a preheated oven at 200°C/400°F for 30 minutes. If it looks like it’s browning too soon, then cover with an aluminium foil (because it’s going to be in the oven for another 30 minutes after it’s been layered into the tart). Once done, let it cool for about 15 minutes. Add in half the grated cheese.
  3. Mix the yoghurt, remaining half of the cheese and chilli flakes.
  4. Line the tart tin with the pizza dough and spread the cheese mixture evenly. Scatter the roasted vegetables on top and bake it in a hot oven for 25-30 minutes at 170°C/325°F. Remove from the oven and let it cool before cutting it into slices for serving.

{ 24 comments }

Yesterday morning I got a call from a lady, “I’d like to order pesto rolls and cupcakes”, she said.  Just like I do with every such call, I grabbed my order book to note down the details. I asked my standard set of questions and then finally, the address for delivery.  She said, “That would be next door!”

I was pleasantly surprised! I hadn’t announced about my foray into catering around here, and we don’t really talk much except exchange brief pleasantries when we happen to bump into each other in the elevator. How did she know? She told me she was thrilled to see me in the day’s Mid Day and cooed about the details. (For those of you who don’t know about it, Mid Day is Bombay’s largest local paper, with over 150k daily readers). I knew I’d be in it one of these days, but didn’t expect it to be yesterday, and I certainly didn’t expect it to be this huge! A full page coverage, and the first page too carried a teaser to the story. Have a look at the full story, and to see me giving the camera a big, very conscious smile (it’s hard for me!).

A big thank you too all for your calls, emails, Twitter and Facebook messages!  Your support made my day.

And just so I don’t have another post without a recipe, I’m going to share with you a recipe for a corn and spinach quiche I made a few days ago.

The filling is a little more for a 6-7 inch quiche, but would be perfect for a 9 inch quiche. I scrambled up the leftover filling and topped it over a bread brushed with garlic oil and then toasted it in a cast iron pan (that makes the bread so crunchy) for a snack.

Corn and Spinach Quiche

Corn and Spinach Quiche Recipe
Yield: One 9 inch tart

Shortcrust Recipe
Adapted from: The Ottolenghi Cookbook (IndiaUK)

300g flour
160g butter
70ml ice cold water


Corn and Spinach Filling Recipe

2 tbsp olive oil
1 small onion
3 cloves of garlic
1 cup / 200g corn
½ cup spinach, washed and chopped
½ cup / 100ml cream (heavy ream would be lovely, I used 25% fat cream)
3 eggs, beaten
1 tsp chilli flakes
Salt and pepper to taste

  1. Make the shortcrust pastry following the instructions for a perfect pie crust. Blind bake the quiche for 15 minutes, or until slightly golden in colour. Brush with eggwash and bake for another 2-3 minutes. Remove from the oven and set aside to cool.
  2. For the filling, heat the olive oil in a pan and sauté the onions until translucent. Add the garlic and let it cook for another minute or so, until fragrant.
  3. Add the corn and then finally the spinach and cook for 5-7 minutes until the corn is cooked. Set aside, and let it cool.
  4. In a bowl, beat the eggs and stir in the cream. Season with salt and pepper and add the chilli flakes. Add the cooled corn and spinach mixture and check for seasoning.
  5. Pour the filling into the precooked quiche base and bake it in the oven at 175°C/350°F for 15-17 minutes until the egg mixture has firmed up.
  6. Remove from the oven, and let it cool.
  7. Slice up, and eat!

{ 37 comments }